Ensuring Web Security With MikroTik Router Proxy
Proxy servers are a crucial part of any network infrastructure that seeks to provide a secure and reliable connection between users and online content. Whether you're running a small business or managing a large corporate network, understanding how to configure a proxy server can help keep your network secure and improve performance. In this article, we'll explore the ins and outs of MikroTik Router Web Proxy configuration and how to get started.
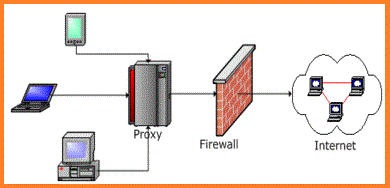
What is a Proxy Server?
A proxy server is a server that acts as an intermediary between a client and a server. It sits between the client and the server, intercepting all requests from the client to the server and then forwarding those requests on to the server. This allows the proxy server to handle all requests made by the client and apply any necessary filters or controls before forwarding the request onto the server.
MikroTik Router Web Proxy is a built-in proxy server in MikroTik RouterOS that can be used to provide HTTP caching and filtering. It is a transparent proxy, which means that it can be used without any special configuration on the client-side. The MikroTik Router Web Proxy is fast, secure and easy to use and can be configured to work with a variety of different network setups.
Why Use a Proxy Server?
There are many reasons why an organization might choose to use a proxy server, including:
- Improved Network Performance: Proxy servers can help improve network performance by caching frequently accessed content. This reduces the amount of data that needs to be transmitted over the network and reduces latency.
- Content Filtering: Proxy servers can be used to control access to specific types of content by filtering requests based on URL, MIME type, or content keywords. This can help organizations comply with regulatory requirements or prevent access to inappropriate content.
- Enhanced Security: Proxy servers can help enhance network security by filtering out malicious content and blocking access to known threats. This can help prevent malware infections and data breaches.
- Bandwidth Management: Proxy servers can be used to limit or control bandwidth usage, ensuring that critical applications or services have access to the necessary resources.
- Access Control: Proxy servers can be used to control access to specific resources or services on the network, limiting access to authorized users or groups.
- Privacy: Proxy servers can help protect user privacy by masking IP addresses and preventing web tracking by advertisers.
How to Configure MikroTik Router Web Proxy
Configuring MikroTik Router Web Proxy is a straightforward process that can be completed in just a few steps. Here's how to get started:
Step 1: Configure IP Addressing
Before configuring MikroTik Router Web Proxy, you'll need to ensure that your RouterOS device has a valid IP address. You can add an IP address to a MikroTik device using the following command:
/ip address add interface=ether1 address=192.168.1.1/24
This command will add an IP address to interface Ether1 with an IP address of 192.168.1.1 and a subnet mask of /24.
Step 2: Configure DNS
Next, you'll need to specify the DNS server for your RouterOS device. You can do this using the following command:
/ip dns set servers=8.8.8.8
This command will set the DNS server for your MikroTik device to Google's DNS server at 8.8.8.8. You can replace this value with the DNS server of your choice.
Step 3: Configure Web Proxy
To configure MikroTik Router Web Proxy, you'll need to specify the port that the proxy server will listen on. You can do this using the following command:
/ip proxy set enabled=yes port=8080
This command will enable the MikroTik Router Web Proxy and set it to listen on port 8080. You can replace this value with the port of your choice.
Step 4: Configure Access Rules
Next, you'll need to configure access rules that specify which clients are allowed to use the proxy server. You can do this using the following command:
/ip proxy access add action=allow src-address=192.168.1.0/24
This command will allow all clients on the 192.168.1.0/24 network to access the MikroTik Router Web Proxy. You can replace this value with the IP address range of your network or specify individual IP addresses.
Step 5: Configure Cache Size
MikroTik Router Web Proxy can be configured to cache frequently accessed content to improve performance. To configure the cache size, you can use the following command:
/ip proxy set cache-size=1000000
This command will set the cache size for the MikroTik Router Web Proxy to 1,000,000 bytes. You can replace this value with the cache size of your choice.
Conclusion
MikroTik Router Web Proxy is a powerful and versatile tool that can be used to enhance network performance, improve security, and control access to content. By following the steps outlined in this article, you can quickly and easily configure the proxy server to meet your organization's specific needs. Whether you're looking to limit bandwidth usage, enforce content filtering policies, or improve network performance, MikroTik Router Web Proxy is a reliable and effective solution.


Post a Comment for "Ensuring Web Security With MikroTik Router Proxy"