Multi-WAN Load Balancing On MikroTik Router Configuration Guide
MikroTik Load Balancing with 2 PPPoE and 1 Static WAN using ECMP is a must-learn skill for anyone looking to have high network availability and faster internet access. The method described here is an effective way to balance the load across multiple WAN links, thus eliminating any single point of failure.
What is MikroTik Load Balancing?
MikroTik Load Balancing is a technique used to distribute incoming network traffic over multiple internet connections automatically. The goal is to make sure that traffic is evenly distributed across all available internet connections, ensuring that the load is shared and that no single link is overloaded. In the case of a network outage or a link failure, MikroTik Load Balancing ensures that traffic is still being sent through the other live internet connections.
How does MikroTik Load Balancing work?
MikroTik Load Balancing works by dividing traffic coming from one source into multiple internet connections. It does this by performing routing decisions based on specific conditions such as the type of traffic, network load, and connection status. There are several methods of MikroTik Load Balancing, such as:
- Policy-based routing
- Equal-cost multi-path routing (ECMP)
- Round-robin load balancing
- Least-connections load balancing
Advantages of MikroTik Load Balancing
There are many advantages to using MikroTik Load Balancing, including:
- Better internet connectivity. Load balancing makes use of all available internet connections, making your internet connectivity more reliable and faster.
- Reduced downtime. In the case of a link failure or a network outage, the remaining live links will continue to operate, thus reducing downtime and increasing network availability.
- Reduced costs. Instead of relying on a single internet connection, load balancing allows you to make use of all available internet connections, reducing the need to purchase additional internet connections. This can lead to significant cost savings in the long run.
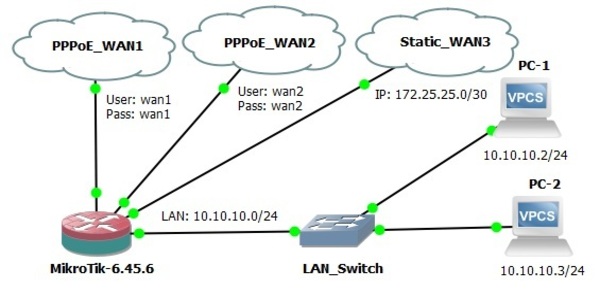
Setting up MikroTik Load Balancing with 2 PPPoE and 1 Static WAN Using ECMP
Here are some steps to follow in setting up MikroTik Load Balancing with 2 PPPoE and 1 Static WAN using ECMP:
Step 1: Configuring IP Addresses and Routes
The first step is to configure IP addresses and routes, which ensure that traffic is directed appropriately between the different WAN interfaces. Here are the steps to follow:
- Log in to your MikroTik router using your credentials.
- Click on IP and select Addresses. Add an IP address to each interface. For PPPoE connections, add an IP address to the PPP interface; for the static WAN, add an IP address to the ethernet interface. An example of how to add IP addresses is shown below:
- Add a default route for each ISP. Specify the gateway IP address for each ISP as follows:
- Add a static route to each WAN link. To make sure that traffic coming from the LAN interface is directed through the correct WAN interface, add a static route for each WAN link as follows:
- Enable ECMP load balancing. To enable ECMP load balancing, go to IP -> Route and double-click on the default route. Change the gateway types to both, and click on the “Action” dropdown to choose “ECMP”. Enter the required values and click “OK”.
/ip address add address=192.168.10.1/24 interface=ether1 add address=192.168.20.1/24 interface=pppoe-out1 add address=192.168.30.1/24 interface=pppoe-out2
/ip route add dst-address=0.0.0.0/0 gateway=ISP1-gateway1 add dst-address=0.0.0.0/0 gateway=ISP2-gateway2
/ip route add dst-address=192.168.20.0/24 gateway=192.168.20.1 add dst-address=192.168.30.0/24 gateway=192.168.30.1
Step 2: Configure Routing Mark
The routing mark used by the MikroTik router can help identify the type of traffic and the WAN link used to route that specific traffic flow. Here are the steps to follow:
- Go to IP -> Firewall -> Mangle. Click on the “+” button to add a new rule.
- Enter the details of the routing mark, such as the protocol, source address, destination address, and the action to take.
Step 3: Configure NAT
After configuring IP addresses and routes, the next step is to configure network address translation (NAT) rules so that the MikroTik router can direct incoming and outgoing traffic to the correct interfaces. Here are the steps to follow:
- Go to IP -> Firewall -> NAT and click on the “+” button to add a new NAT rule.
- Enter the details of the NAT rule, such as the protocol, source address, destination address, and the action to take.
In Conclusion
MikroTik Load Balancing is a powerful way to increase network availability and speed up internet connectivity. By using the techniques described above, you can balance the load across multiple WAN interfaces and ensure that traffic is being directed appropriately. Remember to always test your configuration before deploying it to your production environment, and keep track of any changes you make to the configuration for future reference.


Post a Comment for "Multi-WAN Load Balancing On MikroTik Router Configuration Guide"