Mastering MikroTik Router VLAN Configuration
Are you looking to set up VLANs on your Mikrotik router but don't know where to start? Well, you've come to the right place. In this post, we'll walk you through the process of trunking and add VLANs, and even include some helpful tips to help you set it up quickly and with ease.
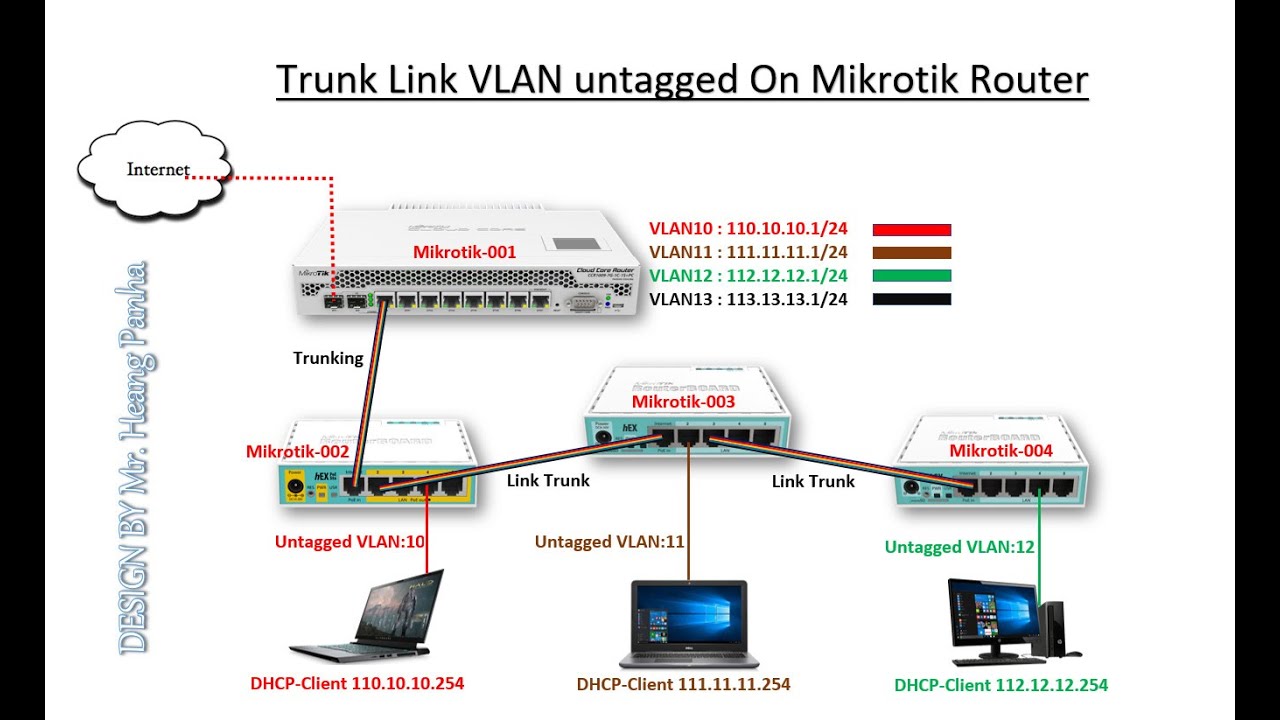
Before we dive in, let's start by defining what a VLAN is. A VLAN, or Virtual Local Area Network, is a technology that allows you to segment your network into separate virtual sub-networks. This can be very useful in certain situations, such as when you have different groups of users with different access requirements or when you want to keep specific types of traffic separate from the rest of the network.
Trunking and Adding VLANs on Mikrotik
If you're using a Mikrotik router, the first step in setting up VLANs is to enable VLAN support on the router interface. To do this, you need to select the interface that you want to use as the trunk and then add the 'vlan-mode=trunk' parameter to it. This will tell the router to treat the selected interface as a trunk port and allow it to pass traffic for all VLANs that are configured on the network.
Once you've enabled VLAN support on the router interface, the next step is to create the VLAN interfaces you want to use on the virtual network. To do this, simply go to the 'Interfaces' menu in the Mikrotik configuration interface and select 'VLAN' from the list of options. From there, you can add new VLAN interfaces by specifying the appropriate VLAN ID and selecting the parent interface that you want to associate it with.
Untagged and Tagged VLANs
When working with VLANs, there are two types of interfaces that you can configure: tagged and untagged. An untagged VLAN interface is one where the VLAN ID is not included in the Ethernet frame header. This means that any traffic that is sent or received on this interface will not be associated with a particular VLAN. Instead, it will be treated as part of the default VLAN for that interface.
A tagged VLAN interface, on the other hand, includes the VLAN ID in the Ethernet frame header. This allows the router to associate each packet with a specific VLAN and route it accordingly. Tagged VLANs are commonly used when you need to support multiple VLANs on a single interface, such as when you're connecting a switch to a router.
Configuring VLANs on Mikrotik
Now that you understand the basics of trunking and VLANs, here's a step-by-step guide to configuring VLANs on a Mikrotik router:
- Log in to the Mikrotik configuration interface using your web browser.
- Go to the 'Interfaces' menu.
- Select the interface that you want to use as the trunk and add the following parameter to its settings: 'vlan-mode=trunk'.
- Go to the 'VLAN' menu and create a new VLAN interface, specifying the appropriate VLAN ID and selecting the parent interface that you want to associate it with.
- If you want to create a tagged VLAN interface, add the following parameter to the VLAN interface settings: 'vlan-id=xxx', where 'xxx' is the VLAN ID that you want to use.
- Repeat step 4 and 5 to create additional VLAN interfaces as needed.
Conclusion
Configuring VLANs on a Mikrotik router can be a little tricky, but with the right knowledge and the right tools, it's definitely doable. By following the steps we've outlined above, you should be able to set up VLANs quickly and with ease, and have a virtual network that is tailored to your specific needs. Just remember to take your time and test each step carefully to ensure that everything is configured correctly before moving on to the next step.
If you have any questions or need further assistance configuring VLANs on your Mikrotik router, feel free to contact us. Our team of experts is always ready and willing to help with any networking issues you may encounter.


Post a Comment for "Mastering MikroTik Router VLAN Configuration"