Advanced Proxy Configuration On MikroTik Router
Mikrotik Router is a popular choice amongst many network administrators for its powerful and flexible features. In this guide, we will walk you through the basic configurations of a Mikrotik Router.

Step 1: Connect to the Router
The first step in configuring your Mikrotik Router is to connect to it. To do this, you will need a computer with an Ethernet port and a cable to connect to your router.
- Connect one end of the Ethernet cable to your router's Ethernet port.
- Connect the other end of the Ethernet cable to your computer's Ethernet port.
- Set your computer's IP address to a static IP address in the same range as your router's IP address.
- Open a web browser and enter your router's IP address in the address bar.
- Enter your router's username and password.
Step 2: Configure Basic Settings
Once you have connected to your Mikrotik Router, the next step is to configure some basic settings.
- Change the default password. Select "System" from the main menu, then "Passwords." Enter a new password and confirm it.
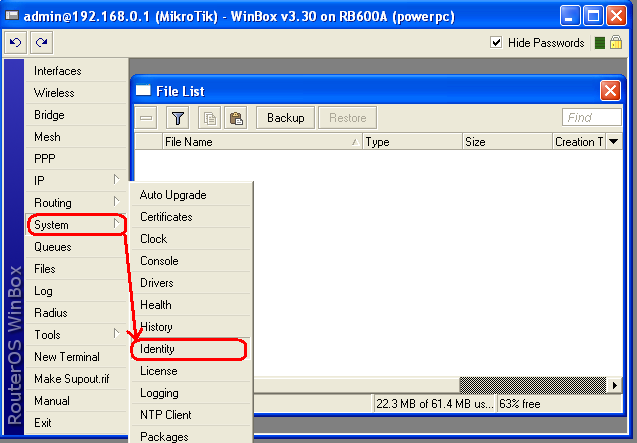
- Set the hostname. Select "System" from the main menu, then "Identity." Enter a hostname for your router.
- Set the timezone. Select "System" from the main menu, then "Time." Set the timezone and NTP server.
- Configure wireless settings. Select "Wireless" from the main menu, then "Wireless Interfaces." Create a new interface or edit an existing one. Set the SSID, frequency, encryption, and other settings.
Step 3: Configure DHCP Server
The Dynamic Host Configuration Protocol (DHCP) is a network protocol used to automatically assign IP addresses and other network settings to devices on a network.
- Select "IP" from the main menu, then "DHCP Server."
- Enable the DHCP server by checking the "Enabled" checkbox.
- Set the IP address range for the DHCP server.
- Set the lease time for the assigned IP addresses.
- Configure any additional settings such as DNS and WINS servers.
Step 4: Create Firewall Rules
Firewall rules are used to control network traffic and provide a layer of security to your network.
- Select "IP" from the main menu, then "Firewall."
- Click "Filter Rules" and create new rules for inbound and outbound traffic.
- Set the action for each rule, such as allow or deny.
- Configure any additional settings, such as source and destination IP addresses and ports.
Step 5: Configure NAT
Network Address Translation (NAT) is used to allow devices on your internal network to access the internet using a single public IP address.
- Select "IP" from the main menu, then "Firewall."
- Click "NAT" and create new rules for the internal and external interfaces.
- Set the action for each rule, such as masquerade or redirect.
- Configure any additional settings, such as source and destination IP addresses and ports.
Conclusion
In summary, configuring a Mikrotik Router involves connecting to the router, configuring basic settings, setting up DHCP, creating firewall rules, and configuring NAT. By following these steps, you can set up a basic network using a Mikrotik Router.
Remember to keep your router's firmware up to date and to secure it by changing the default password and configuring firewall rules.


Post a Comment for "Advanced Proxy Configuration On MikroTik Router"