Securing Network Connections With MikroTik VPN
MikroTik routers have proven to be robust networking equipment that performs diverse operations in internet service delivery. One of the core functions of these routers is configuring virtual private networks (VPNs) for remote access. Remote clients find VPNs particularly useful as they provide them with secure access to their organization's network and data. In this piece, we will delve into the process of configuring MikroTik VPNs step by step to give a comprehensive understanding of the setup.

Before we begin, let us have a lucid understanding of the terms Virtual Private Network and PPTP which we will be mentioning in the course of the article.
Virtual Private Network (VPN)
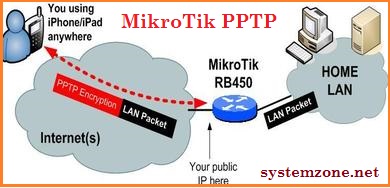
A VPN is a secure and encrypted point-to-point connection across the internet. It extends a private network to a remote device such as a laptop, smartphone, or desktop over the public internet. A VPN can be likened to a "tunnel" that transmits data securely over the internet. VPNs provide remote access to shared data resources, electronic mailboxes, and other products that data communications networks offer. As such, VPNs enhance productivity and enhance communication within teams and organizations.
Point-to-Point Tunneling Protocol (PPTP)
PPTP differs from other protocols in that it does not require a high level of encryption. Instead, it uses a tunnel to encapsulate Point-to-Point Protocol (PPP) packets between the VPN client and server. PPTP is secure and fast, making it one of the most widely used protocols for VPNs. Nevertheless, it has some vulnerabilities to exploit the encryption keys, which might give hackers unauthorized access to the network. Therefore, it is always advisable to use additional security measures when using PPTP.
Configuring MikroTik VPNs
The following steps should be followed for configuring MikroTik VPNs:
Step 1: Access the RouterOS using Winbox or Web Interface
The process begins by accessing the RouterOS via Winbox or Web Interface. Both of these interfaces have the same level of functionality. You should have RouterOS installed on your system before continuing with the setup process. To access the RouterOS via Winbox, follow these steps:
- Open the Winbox application and click the [...]
- Fill in the IP address of the MikroTik router and click the connect button
- If the connection is successful, you will be prompted to enter your credentials (username and password)
If you choose to access the RouterOS using the web interface, you must first connect your device to the router using an ethernet cable and open a browser. Then enter the router's IP address on the browser. If you get a login prompt, enter your credentials and click "login."
Step 2: Add Interfaces and IPs
The second step involves configuring interfaces and IPs. To do this:
- On the Winbox menu, select IP | Addresses
- Click the '+' button to add an IP
- Fill in the details, including IP address, network address, and interface. Ensure to select the interface appropriately (e.g., ether1 is selected in this case). Finally, click the apply button.
Step 3: Add PPTP Server
A PPTP server is what clients will connect to when seeking to establish a VPN connection. The following steps are used to configure a PPTP server:
- On Winbox, select PPP | PPTP Server
- Click the '+' button to create a new server
- Fill in the settings: name (e.g., PPTP), user (the name used on the client side), and password. Then proceed to apply the changes.
Step 4: Enable PPTP Ingress Rule
Enabling the PPTP ingress rule ensures that traffic from a remote device is allowed into the network. To enable:
- On the Winbox menu, click 'IP | Firewall'
- Then go to the 'Filter Rules' tab, click the '+' button, and fill in/exist the entered setting
- Create a new rule with the chain name: "input," protocol: "tcp," dst. port: "1723," and action: "accept." Click the apply button to save the changes.
Step 5: Allow Traffic Through the VPN
Traffic needs to be allowed through the VPN for the connection to be established. To do this:
- On the Winbox menu, click 'IP | Firewall'
- Select the 'Nat' tab, then click the '+' button and fill in the settings as follows:
- Chain name: "srcnat"
- Protocol: "tcp"
- Src. address: your network address
- Src. port: "0-65535"
- Action: "masquerade"
Step 6: Create a Client PPTP Connection
A client PPTP connection is needed to connect to a remote network. To create a client PPTP connection:
- On the Winbox menu, click PPP | Interfaces
- Select the '+' button to add a new interface
- Select "pptp-client" from the list of interface types, then proceed to fill in the settings: name, remote-address (fill in the IP address of your router), user, and password.
- Click the apply button to save the changes.
Step 7: Additional Security Measures
Although PPTP offers security and privacy, it is not totally invincible to breaches. Therefore, it is crucial to use additional security measures, especially when transmitting sensitive data. These measures include:
- Using the router's built-in firewall to block suspicious traffic
- Using a strong password that can withstand brute force attacks
- Using a VPN encryption protocol that is more secure, such as L2TP, IKEv2, or OpenVPN.
Conclusion
MikroTik VPNs are a secure and reliable way of establishing secure remote access to organizational resources. In this article, we have outlined the steps of configuring PPTP-based VPNs on MikroTik routers. We have also highlighted additional security measures that are important in ensuring the integrity of data transmitted over the VPN.


Post a Comment for "Securing Network Connections With MikroTik VPN"