Optimizing MikroTik Proxy Server For Content Filtering
As the internet continues to expand and evolve, so does the need for cybersecurity. With more and more data being transferred online, it’s important to make sure that we’re taking the proper precautions to keep our information safe from unauthorized access. One way that individuals and organizations can protect themselves is by blocking access to free proxy servers. In this article, we’ll explore how to do that using MikroTik Filter Rules.
Before we get started, let’s first understand what free proxy servers are and why they’re problematic. A proxy server is a server that acts as an intermediary between a client and the internet. When a user connects to a proxy server, their request is sent through the server, which then sends the request to the internet on behalf of the user. This can be useful in certain situations, such as accessing restricted content or improving network performance. However, free proxy servers are often used for malicious purposes, such as hiding a user’s IP address to avoid detection or accessing restricted content without permission.
So, how do we go about blocking access to free proxy servers? The answer lies in MikroTik Filter Rules. Filter Rules allow you to define how traffic flows through your network, and can be used to block or allow certain types of traffic.
Setting Up MikroTik Filter Rules
Setting up MikroTik Filter Rules can be a bit complicated, so we’ll break it down into several steps:
Step 1: Create a New Filter Rule
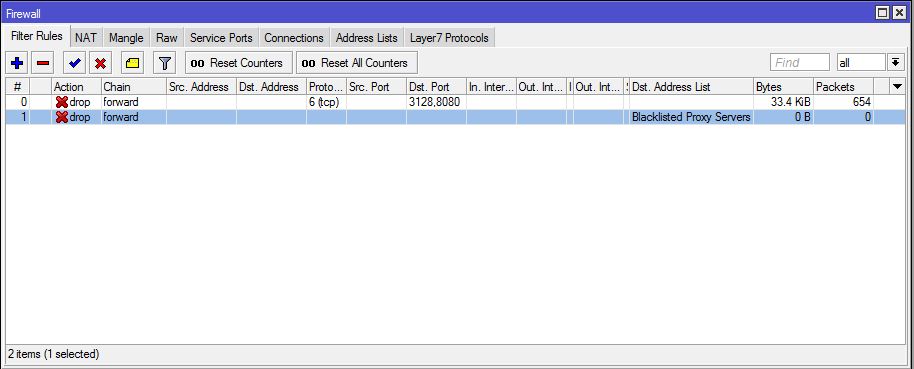
The first step is to create a new Filter Rule. To do this, open up the MikroTik RouterOS and navigate to the IP > Firewall section. Then, click on the Filter Rules tab and click the Add New button.
Step 2: Define the Filter Action
Once you’ve created a new Filter Rule, you need to define the Filter Action. In this case, we want to block traffic to free proxy servers, so we’ll select the Drop action. This means that any traffic that matches the criteria we define in the next step will be dropped, or blocked.
Step 3: Define the Filter Criteria
The next step is to define the Filter Criteria. This is where we specify the conditions under which traffic will be blocked. In this case, we’re going to block traffic to known free proxy servers based on their IP addresses.
To do this, we’ll use a list of IP addresses that we’ve sourced from various online databases. We’ll create a new Address List and add the IP addresses to it. Then, in the Filter Criteria section of the Filter Rule, we’ll select the Address List and specify that we want to block traffic to any IP addresses in the list.
Step 4: Apply the Filter Rule
The final step is to apply the Filter Rule. To do this, we’ll select the Interface that we want to apply the rule to (e.g. the WAN interface) and click Apply. Once the rule is applied, any traffic that matches the Filter Criteria will be dropped, effectively blocking access to free proxy servers.
Conclusion
By using MikroTik Filter Rules to block access to free proxy servers, you can better protect your organization from malicious attacks and unauthorized access. Remember, it’s important to stay vigilant when it comes to cybersecurity. Always be on the lookout for potential threats, and take the necessary steps to keep your data safe.


Post a Comment for "Optimizing MikroTik Proxy Server For Content Filtering"