Securing Your Network With MikroTik VPN Solutions
Hey there! Have you been looking for a secure way to connect your remote offices or workers to your company network? Look no further because I've got you covered! I've recently come across a great solution for Site-to-Site VPN setup using MikroTik SSTP VPN protocol. In this post, I'll explain in detail how to set up MikroTik Site-to-Site SSTP VPN with RouterOS Client.
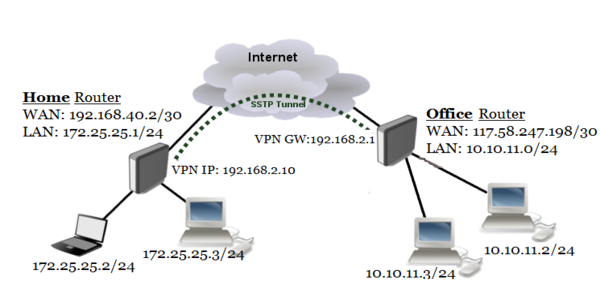
First off, let's define what a Site-to-Site VPN is. A Site-to-Site VPN is a type of VPN connection that allows you to connect multiple networks together securely through the internet. In simpler terms, it's like having a virtual cable connecting your company's network to another network.
MikroTik is a popular router and networking solutions provider. Setting up a Site-to-Site VPN with MikroTik SSTP VPN is quite simple and straightforward if you know what steps to follow. Here are some simple steps to get started:
Step 1: Setting up MikroTik Router for SSTP VPN
The first step is to set up the MikroTik Router for SSTP VPN. Here's a detailed explanation of how to do it:
- Log in to your MikroTik Router using your web browser and navigate to the "PPP" menu.
- Click on the "SSTP Server" tab and then click on "Add New."
- In the "General" tab, give a name to your SSTP VPN server, configure the port and IP address, and set up the authentication.
- In the "Certificates" tab, upload or generate a CA and server certificate.
- In the "Clients" tab, you can set up the SSTP VPN client settings.
- Click "Apply" to save the settings.
Step 2: Setting up the MikroTik Client
The next step is to set up the MikroTik Client. Here's how to do it:
- Open your MikroTik Router and navigate to "PPP" and then "SSTP Client."
- Click on "Add New" and specify the server IP and port.
- In the "Auth" tab, specify the authentication settings.
- In the "Certificate" tab, click on the "Import" button and import the server certificate and CA.
- Click "OK" to save the settings.
Step 3: Testing the VPN Connection
Now that you have set up the MikroTik Router and Client, it's time to test the VPN connection. Here's how to do it:
- On the MikroTik Router, navigate to the "Interfaces" menu and click on "SSTP Server."
- Click on the "Active Members" tab and check if the client is connected.
- On the MikroTik Client, navigate to the "System" menu and click on "Peers."
- You should see the SSTP VPN connection status as connected.
- Test the VPN by trying to access files and applications on the remote network.
That's it! With these few steps, you can easily set up a Site-to-Site VPN using MikroTik SSTP VPN protocol. You can now enjoy a secure and private connection between your networks and remote workers.
One of the major benefits of using MikroTik SSTP VPN is its high level of security. SSTP VPN uses SSL/TLS encryption that ensures a high level of encryption, making it difficult for hackers to intercept or decipher your data. This makes it a great option for businesses that deal with sensitive or confidential data.
In conclusion, setting up MikroTik Site-to-Site SSTP VPN with RouterOS Client is an easy and secure way to connect your networks and workers. With the steps I've outlined above, you can quickly get started and enjoy a secure and private connection. So, why not give it a try today?


Post a Comment for "Securing Your Network With MikroTik VPN Solutions"