Load Balancing Techniques With MikroTik Router Proxy Server
In today's world, internet connectivity is crucial for businesses to function effectively. However, what happens when one internet service provider (ISP) is not enough? It can lead to downtime, slow connections, and even financial loss. This is where load balancing comes in - a technique used to distribute network traffic across multiple ISPs to ensure high availability and faster access. In this post, we will look at how to set up load balancing with two ISPs using Mikrotik.
Step 1: Understanding Load Balancing
Load balancing is the process of distributing network traffic across multiple ISPs to avoid overloading any one ISP and ensuring high availability and faster access. It works by distributing traffic based on various factors, such as the speed of the connection, availability of the ISP, and network congestion. In this way, load balancing can optimize performance, speed up access, and reduce downtime.
Step 2: Acquiring the Necessary Equipment
To set up load balancing with two ISPs using Mikrotik, you will need:
- A Mikrotik router
- Two internet service providers
- Two network interface cards (NICs)
- Patch cables (to connect the NICs to the router)
Step 3: Configuring the Router
Once you have all the necessary equipment, you can proceed to configure the router. Here are the steps to follow:
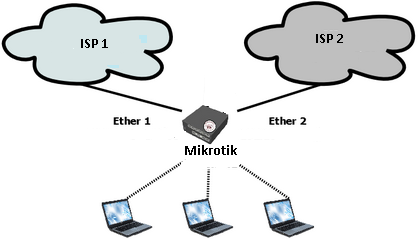
Step 3.1: Set up the NICs
Connect the first NIC to one of the ISPs, and the second NIC to the other ISP. Make sure that both NICs have separate IP addresses, and that they are connected to the correct ports on the router.
Step 3.2: Configure IP Addresses
Using the Winbox software, configure the IP addresses of the NICs as follows:
- NIC 1: IP Address - 192.168.1.1/24; Gateway - ISP 1 Gateway
- NIC 2: IP Address - 192.168.2.1/24; Gateway - ISP 2 Gateway
Step 3.3: Set up Load Balancing
Now it's time to set up load balancing. Here are the steps:
- Open the Mikrotik menu in the Winbox software.
- Click on "IP" in the left-hand menu and select "Firewall".
- Click on the "NAT" tab, and then click "Add New".
- In the "General" tab, select "Chain" as "srcnat" and "Action" as "masquerade".
- In the "Out Interface" tab, select both NICs.
- In the "Action" tab, click on "Advanced".
- Under "Routing Mark", enter a unique name for the route (e.g. "ISP1_Access" and "ISP2_Access".
- Enable "Use IP Firewall" and click "OK".
Step 3.4: Set up Routing
The final step is to set up routing. Here's how to do it:
- Open the Mikrotik menu in the Winbox software.
- Click on "IP" in the left-hand menu and select "Routes".
- Click on "Add New".
- In the "General" tab, enter the following details:
- Destination - 0.0.0.0/0
- Gateway - IP Address of the load balancer (this will typically be the IP Address of the router itself)
- Routing Mark - ISP1_Access (or ISP2_Access, depending on the route being set up)
- Click "OK" to save the route.
- Repeat the process for the other ISP (using the corresponding Routing Mark).
Step 4: Testing the Setup
Once you have completed the above steps, you can test your setup by visiting websites and monitoring the load balancing process. If everything is set up correctly, you should be able to see both ISPs being utilized, and traffic being distributed evenly between them.
Conclusion
Load balancing is an essential technique for businesses needing high availability and speedy internet connections. By effectively distributing network traffic across multiple ISPs, load balancing can improve performance, reduce downtime, and optimize user access. By following the steps outlined in this post, you can set up load balancing with two ISPs using Mikrotik and ensure your business is always online.


Post a Comment for "Load Balancing Techniques With MikroTik Router Proxy Server"