Exploring MikroTik RouterOS VPN Client Setup
Oh boy, oh boy, do I have a treat for all you tech-savvy peeps out there! Are you ready for some juicy knowledge on setting up a Site to Site SSTP VPN Configuration between Two MikroTik RouterOS? I know I am!
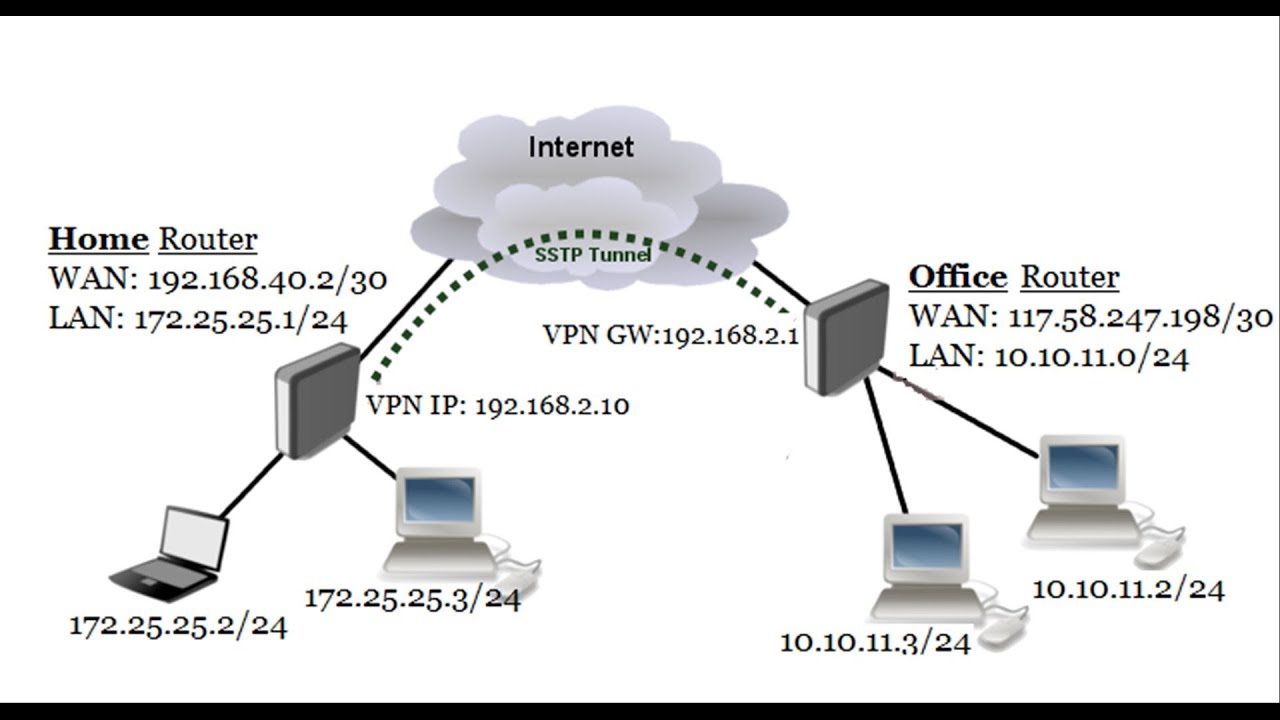
First things first, let's talk about what the heck is a Site to Site SSTP VPN Configuration between Two MikroTik RouterOS. Basically, it's a virtual private network (VPN) connection that allows two networks to securely communicate with each other over the internet. And MikroTik RouterOS is a powerful operating system used for network infrastructure.
Now, onto the nitty-gritty of setting it up. Here's a step-by-step guide:
Step 1: Configuring the IP Addresses
The first thing you need to do is configure the IP addresses of both your MikroTik routers. This involves setting up the LAN and WAN interface addresses as well as the IP addresses on both routers. Here's how to do it:
- Access the MikroTik RouterOS terminal using the Winbox utility.
- Under the 'IP' tab, select 'Addresses' and add IP addresses to both the LAN and WAN interfaces.
- Configure the IP addresses of both routers, making sure they're on the same subnet.
Step 2: Setting up the VPN Tunnel
Next, you need to set up the VPN tunnel between the two MikroTik routers. This involves creating a new interface, adding the necessary IP addresses, and configuring the SSTP VPN settings. Here's how to do it:
- Under the 'Interfaces' tab, select 'SSTP Client' and create a new interface.
- Enter the necessary IP addresses and settings for the VPN tunnel.
- Add the IP address of the remote router as the SSTP server address.
Step 3: Configuring the Firewall
The final step is to configure the firewall settings on both MikroTik routers to allow the SSTP VPN traffic to pass through. Here's how to do it:
- Under the 'IP' tab, select 'Firewall' and create a new rule to allow traffic from the SSTP VPN interface.
- Apply the same rule on the remote router as well.
- Verify the settings and test the connection.
And voila! You've successfully set up a Site to Site SSTP VPN Configuration between Two MikroTik RouterOS! Isn't it exhilarating to learn something new?
Now, before we say our goodbyes, here are some tips to keep in mind:
- Make sure both routers have the same RouterOS version installed.
- Always backup your configuration before making any changes.
- Double-check your IP addresses and VPN settings before testing the connection.
Well, folks, that's all for now. I hope you've learned something from our little tech adventure today. Until next time, happy networking!


Post a Comment for "Exploring MikroTik RouterOS VPN Client Setup"