Configuring MikroTik RouterOS For VPN Connectivity
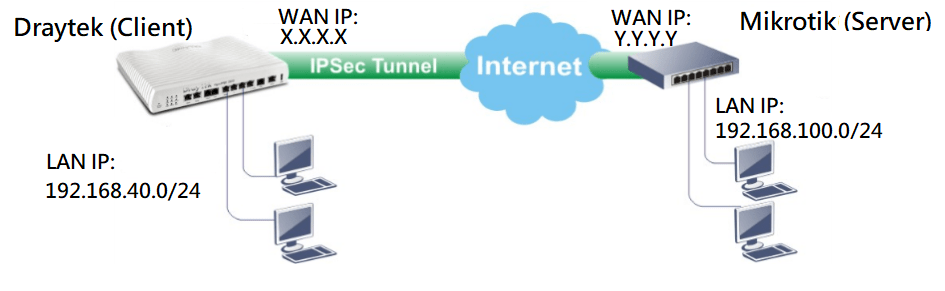
Securing a company's network is one of the most important tasks for network administrators. One way to secure a network is to set up a Virtual Private Network (VPN) connection between two routers. In this post, we will discuss how to set up an IPsec VPN connection between a Mikrotik router and a Vigor router.
Before we proceed with the setup, it is important to understand what IPsec VPN is, and its benefits. IPsec stands for Internet Protocol Security, and it is a protocol used to encrypt and authenticate IP packets in a network. IPsec VPN allows users to securely access the network from a remote location, providing a simple and secure way to connect to a company's internal network.
How to set up an IPsec VPN between a Mikrotik router and a Vigor router
Step 1: Configure the DrayTek Router (Vigor router)
The first step is to configure the DrayTek router. Login to the router's web interface and navigate to VPN and Remote Access. Select the IPsec General Setup tab and enter the following information:
- Tick Enable IPsec VPN Service.
- Select 3rd party or remote dial-in from the VPN type dropdown list.
- Enter a name for the VPN connection in the VPN profile name field.
- Select the Authentication Method as Pre-Shared Key and enter the Pre-Shared Key.
- Select SHA1 for Phase 1 and Phase 2.
- Select 3DES for encryption.
- Enter the internal IP address of the DrayTek router in the Remote Gateway field.
- Tick Enable Perfect Forward Secrecy (PFS).
- Tick Enable Dead Peer Detection (DPD).
- Click on Apply to save the settings.
After the settings are saved, click on the IPsec VPN Status tab to check if the VPN connection is working correctly.
Step 2: Configure the Mikrotik Router (RouterOS v6.47)
The second step is to configure the Mikrotik Router. To configure the Mikrotik Router, follow the steps below:
- Go to IP > IPsec.
- Click on the “Add new” button to create a new profile.
- Enter a name and select “Remote address” for the “Mode” field.
- Enter the public IP address of the DrayTek router in the “Remote Address” field.
- Enter your local IP address in the “Local Address” field.
- Enter the shared secret pre-shared key in the “Secret” field.
- Select “sha1” as the “Hash Algorithm” and “3des” as the “Encryption Algorithm”.
- Click on the “Action” tab and select “encrypt” for the “Action” field.
- Click “OK” to save the IPsec profile.
Once you have saved the IPsec profile, you need to add some firewall rules to allow the VPN traffic to pass. Follow the steps below to add firewall rules:
- Go to IP > Firewall.
- Click on the “Add new” button to create a new firewall rule.
- Enter the following parameters:
- Chain = input
- Protocol = all
- Port = not specified
- Src Address = addr or src-address of the Remote network
- Dst Address = addr or dst-address of the local network
- Action = accept
- Click “OK” to save the firewall rule.
After the firewall rules are added, you should be able to establish an IPsec VPN connection between the Mikrotik Router and the DrayTek Router.
Conclusion
IPsec VPNs are a great way to secure your network and provide remote access to your employees. By following the steps outlined above, you can set up an IPsec VPN between a Mikrotik router and a DrayTek router quickly and easily. If you have any questions or need further assistance, please consult the documentation provided by the router manufacturer.


Post a Comment for "Configuring MikroTik RouterOS For VPN Connectivity"