MikroTik RouterOS VPN Troubleshooting Common Issues
Using a VPN connection to secure your online activity is no longer just an option, but a necessity. With cyber security threats on the rise, it is essential to protect yourself and your online privacy. In this article, we will discuss how to set up an IPsec VPN connection between a Mikrotik router running RouterOS v6.47 and a Vigor router. Firstly, let’s take a closer look at what an IPsec VPN connection is. IPsec, or Internet Protocol Security, is a set of protocols that provides secure communication over the Internet. It encrypts the data that is transferred between the two devices, making it virtually impossible for anyone else to access the information. By setting up an IPsec VPN connection, you ensure that your data is secure, and you reduce the risk of cyber-attacks, snooping, and data theft. Now, let's proceed with the steps on how to set up an IPsec VPN connection between your Mikrotik router and a Vigor router. Step 1: Check Your RouterOS Version Before you proceed with the setup, ensure that your Mikrotik router is running RouterOS version 6.47 or later. You can check this by logging into your router’s web interface and navigating to the “System” menu > “Packages.” Step 2: Configure Your Mikrotik Router To configure your Mikrotik router, follow these steps: 1. Log in to your Mikrotik router’s web interface. 2. Navigate to the “Interfaces” menu and select “VPN.” 3. Click on the “IPsec” tab. 4. Click on the “Proposal” tab and create a new policy using the following settings: • Name: DrayTek • Auth. Algorithms: sha1 • Enc. Algorithms: aes-128-cbc • PFS Group: modp1024 • Lifetime: 28800 5. Click on the “Peer” tab and add a new IPsec peer using the following settings: • Address: [the Vigor router’s WAN IP address] • Auth. Method: pre-shared-key • Exchange Mode: main • Send Initial Contact: checked • My Identity: [your Mikrotik router’s WAN IP address] • Proposal Check: obey • Proposal: default • NAT Traversal: force 6. Click on the “Policy” tab and add a new IPsec policy using the following settings: • Src. Address: [your local network IP range] • Dst. Address: [the remote network IP range] • Tunnel: DrayTek • Action: encrypt • Level: unique • Comment: [a brief description of the policy] Step 3: Configure Your Vigor Router To configure your Vigor router, follow these steps: 1. Log in to your Vigor router’s web interface. 2. Navigate to the “VPN and Remote Access” menu and select “IPsec.” 3. Click on the “Remote Gateway” tab and add a new remote gateway using the following settings: • Gateway Name: Mikrotik • IP Address: [your Mikrotik router’s WAN IP address] • IKE Pre-Shared Key: [the pre-shared key you will create in Step 4] • Exchange Mode: main • Proposal Type: standard • Proposal: AES with sha1 • Authentication Type: Pre-shared-key • PFS: group 2 (modp1024) • SA Life Time: 28800 4. Click on the “VPN Connection” tab and add a new VPN connection using the following settings: • Connection Name: Mikrotik • Remote Gateway: Mikrotik • Local Policy: LAN to LAN • Local Address: [your Vigor router’s LAN IP address] • Remote Address: [the remote network IP range] • IPsec Security Method: High(ESP) • Encryption Algorithm: AES128 • Authentication Algorithm: SHA1 • DH Key Group: group2 (1024 bit) • SA Lifetime: 1440 minutes • Pre-Shared Key: [same key used in Step 3, above] Step 4: Create a Pre-Shared Key To create a pre-shared key, follow these steps: 1. On your Mikrotik router’s web interface, navigate to the “IPsec” menu and select “Identity.” 2. Click on “Add New” to create a new identity. 3. In the “General” tab, enter: • Name: [a name for the pre-shared key] • Remote Identity: [the Vigor router’s WAN IP address] • Address: 0.0.0.0/0 4. In the “Authentication” tab, enter: • Method: Pre-Shared Key • Secret: [enter a secure pre-shared key] 5. Click on “OK” to save the pre-shared key. Step 5: Test Your Connection After completing the setup, it’s essential to test whether the connection is working correctly. To do this, ping a device on the remote network from a device on the local network. Conclusion Setting up an IPsec VPN connection requires some technical expertise, but once set up, it provides an additional layer of security that helps protect your online privacy. By following the above steps, you can create a VPN connection between a Mikrotik router running RouterOS v6.47 and a Vigor router. With the increasing number of cyber-security threats, setting up a VPN connection is an essential step towards protecting yourself and your online activity. 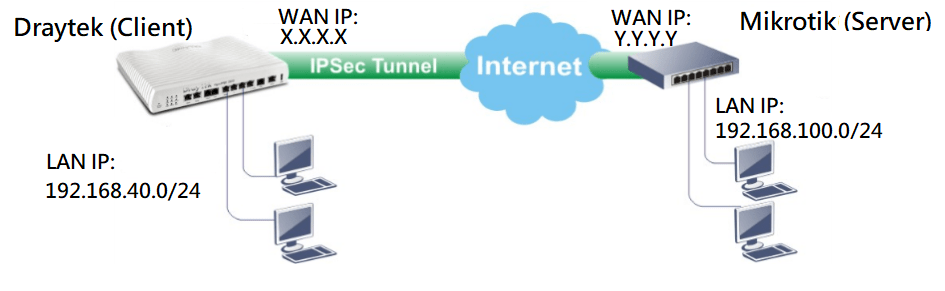


vpn ipsec mikrotik router setup draytek vigor v6 routeros between before
mikrotik queue routeros queues common howto
mikrotik routeros router configure configuration minim
vpn mikrotik setup server pptp configure router
Post a Comment for "MikroTik RouterOS VPN Troubleshooting Common Issues"