Simplified VLAN Configuration On MikroTik Routers
If you're looking to optimize your network's performance and take control of your VLANs, Mikrotik's advanced trunking and VLAN tagging features are exactly what you're looking for. With Mikrotik, you can easily create and manage VLANs on your network, and even add VLAN untagged traffic to make your network more secure and efficient.
Here's how:
Create a Trunk Port
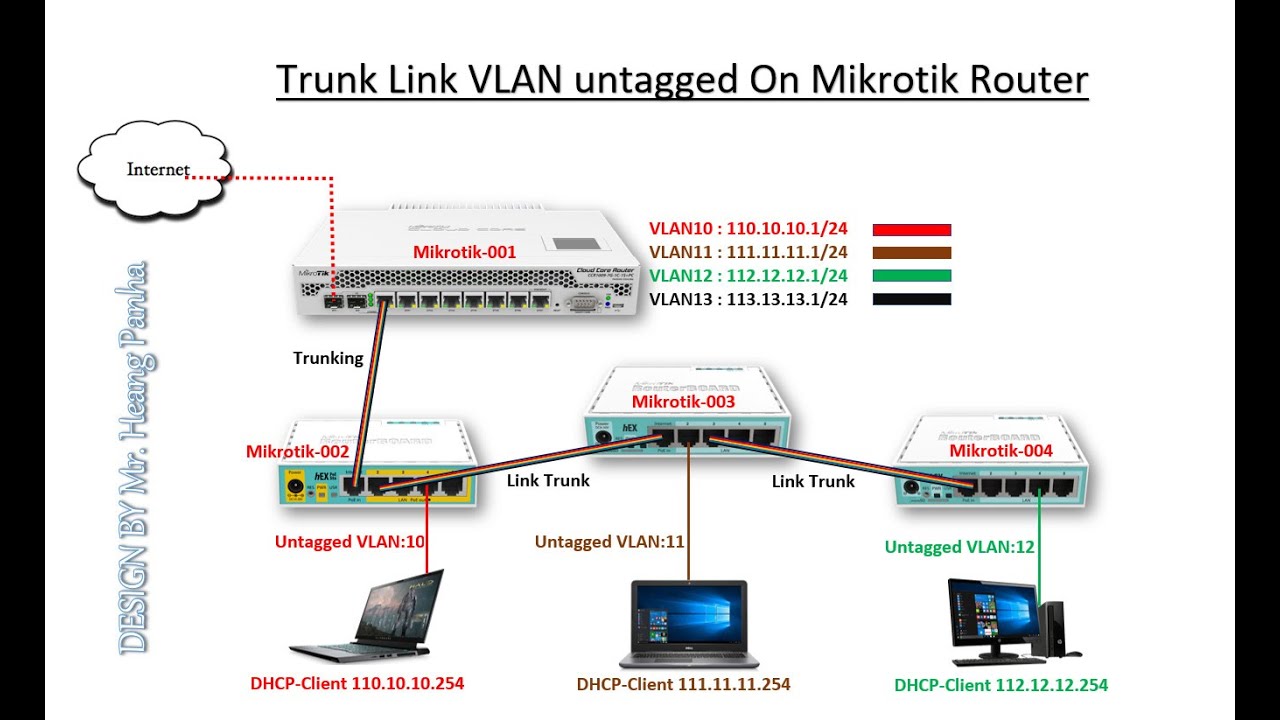
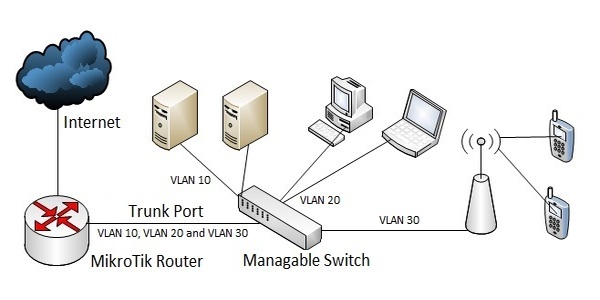
To begin using VLANs on Mikrotik, you will first need to configure a trunk port. A trunk port is a port that carries multiple VLANs simultaneously. To create a trunk port, simply log into your Mikrotik router and follow these steps:
- Click on the Interfaces tab in the left menu
- Click on the Trunk button in the top right corner of the page
- Enter a name for your new trunk port in the Name field
- Under Local Interface, select the port you want to use as the trunk port (e.g. ether1)
- Under VLANS, click on the Add button to add a new VLAN to the trunk port
- Enter a VLAN ID and a VLAN Name for the new VLAN
- Repeat steps 5-6 for each additional VLAN you want to add to the trunk port
- Click Apply to save the trunk port configuration
Once you've created your trunk port, you can start using VLANs on your network.
Create a VLAN Interface
The next step in configuring VLANs on Mikrotik is to create a VLAN interface. A VLAN interface is a virtual interface that is linked to a specific VLAN. To create a VLAN interface, follow these steps:
- Click on the Interfaces tab in the left menu
- Click on the VLAN button in the top right corner of the page
- Enter a name for your new VLAN interface in the Name field
- Under Interface, select the trunk port you created in the previous step
- Enter the VLAN ID for the VLAN you want to link the interface to
- Click Apply to save the VLAN interface configuration
Once you've created your VLAN interface, you can start configuring it to meet your network's needs.
Configure VLAN Tagging
One of the key features of VLANs is VLAN tagging, which enables you to label each packet with a unique ID that tells the network how to handle the packet. To configure VLAN tagging on Mikrotik, follow these steps:
- Click on the VLANs tab in the left menu
- Click on the VLAN ID for the VLAN you want to configure tagging for
- Under VLAN tagging, select the option that matches the tagging method used by your network (e.g. IEEE 802.1q tagging)
- Enter the VLAN ID in the VLAN ID field
- Click Apply to save the VLAN tagging configuration
Once you've configured VLAN tagging, you can start using your VLAN interface to manage traffic on your network.
Add VLAN Untagged Traffic
In addition to VLAN tagging, Mikrotik also allows you to add VLAN untagged traffic to your network. VLAN untagged traffic is traffic that is not labeled with a VLAN ID, and can be useful for adding additional security measures to your network. To add VLAN untagged traffic to your network, follow these steps:
- Click on the VLAN interface you want to add VLAN untagged traffic to
- Under VLAN Tagging, select the option that allows untagged traffic (e.g. Admit All)
- Click Apply to save the VLAN untagged traffic configuration
With VLAN untagged traffic, you can make your network more secure and efficient by only allowing traffic that has been specifically labeled with a VLAN ID to pass through.
Conclusion
By following the steps above, you can easily configure VLANs and trunking on your Mikrotik router, enabling you to optimize your network's performance and take control of your VLANs. Whether you're looking to add VLAN untagged traffic to your network or simply want to create and manage VLANs more efficiently, Mikrotik makes it easy to get the job done.


Post a Comment for "Simplified VLAN Configuration On MikroTik Routers"