MikroTik Router Configuration Essential Tips And Tricks
Are you having trouble on how to set up your MikroTik router? Look no further because we have the perfect solution for you. In this post, we'll show you step-by-step on how to configure your router with ease. But first, let's start with the basics.

Step 1: Accessing the Router
The first and most crucial step when setting up your router is to access it. To do this, you have to connect your computer to the router via an ethernet cable and type in the router's IP address in your browser. The default IP address is usually 192.168.1.1. You'll be prompted to enter your username and password, which is 'admin' for both fields. If you've already changed the password, enter that instead.
Step 2: Updating the Firmware
Updating your router's firmware is strongly recommended as it provides bug fixes and security patches to protect your network. To update, navigate to the 'System > Packages' menu and click on 'Check For Updates.' Your router will then check for updates, and if there's any available, click on 'Download and Install.' The process may take a while, but please don't interrupt it.
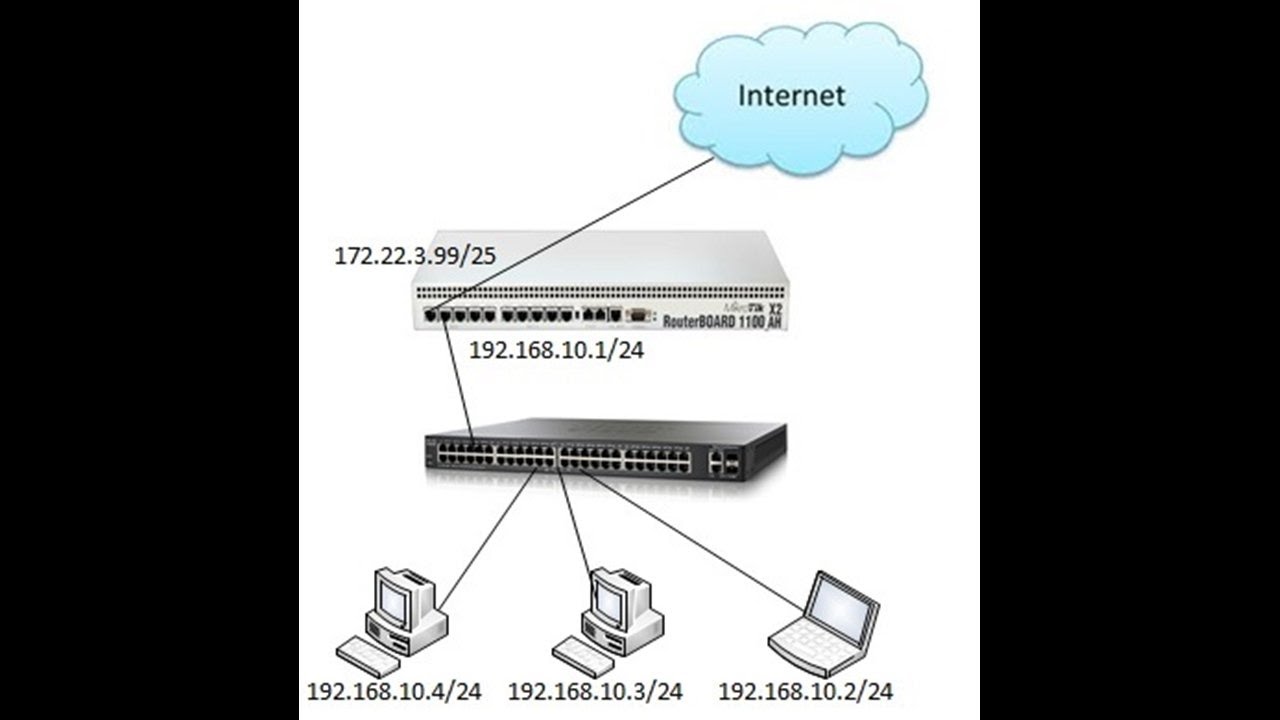
Step 3: Configuring your WAN Connection
The WAN port is where your internet connection is plugged in. Depending on your ISP, the WAN configuration may vary. But generally, you'll need to select the connection type, such as PPPoE or static IP, and enter your ISP-provided credentials, such as username and password. You can find these details on your ISP's website or by calling their customer support.
Step 4: Setting up your LAN Network
Your LAN network is where your devices are connected. By default, your router will assign IP addresses via DHCP. You can change this by configuring a static IP or creating a DHCP server with a specific range of IP addresses. It's also recommended to change the default LAN network to avoid conflicts with other networks.
Step 5: Enabling Firewall and NAT
Firewall and NAT are essential to protect your network from unwanted traffic and attacks. To enable them, navigate to the 'IP > Firewall' menu and create a new rule to block all incoming traffic except for established and related connections. You can also enable NAT by navigating to the 'IP > Firewall > NAT' menu and creating a new rule to masquerade all packets going out to the internet.
Step 6: Setting up DNS and DHCP Server
The DNS server is responsible for translating domain names to IP addresses. By default, your router will use Google's DNS (8.8.8.8 and 8.8.4.4). But you can change this by navigating to 'IP > DNS' and either add a new static DNS or configure a forwarding DNS. DHCP server, on the other hand, is responsible for assigning IP addresses to your devices. You can configure this by navigating to 'IP > DHCP Server.'
And that's it! You've successfully configured your MikroTik router. Please note that these are just the basics and there's more to MikroTik routers than what we've covered in this post. You can explore more features and configurations to optimize your network's performance and security.

![Mikrotik Router [Login, Setup, Reset, Defaults] - Techwarior](https://techwarior.com/wp-content/uploads/2020/03/How-to-set-up-a-Mikrotik-Router-1024x416.png)
Post a Comment for "MikroTik Router Configuration Essential Tips And Tricks"