Configuring Load Balancing With MikroTik Routers
Have you ever struggled with slow internet speeds or buffering while trying to watch your favorite videos online? Have you considered that the issue may be with your internet provider and not your device? If so, you may want to consider implementing a MikroTik Load Balancing system that utilizes multiple gateways.

Load balancing is the technique of distributing network traffic across multiple network links in order to increase redundancy and availability. By balancing the outgoing traffic between multiple internet providers, you can increase your chances of having stable and consistent internet speeds. And with MikroTik, implementing load balancing can be a seamless process.
Why MikroTik?
MikroTik provides a variety of routers and wireless access points that an individual or small business can use to implement load balancing over multiple gateways. And the beauty of MikroTik is in its simplicity and affordability. With MikroTik, there is no need for expensive and complicated enterprise-grade hardware. All you need is one of their routers and a few ethernet cables.
How to Implement MikroTik Load Balancing
Here is a step-by-step guide on how to implement MikroTik Load Balancing over Multiple Gateways:
- Obtain MikroTik Router - First, you need to obtain a MikroTik router. MikroTik provides a variety of routers that are ideal for load balancing over multiple gateways, such as the MikroTik hEX (RB750Gr3), the MikroTik RouterBoard (RB2011UiAS-2HnD-IN), or the MikroTik Cloud Router Switch (CRS125-24G-1S-IN).
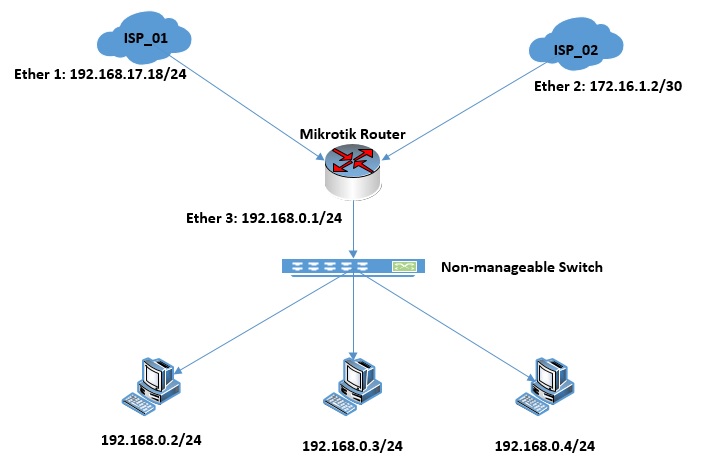
- Connect Multiple WAN Connections - Next, connect all your WAN connections to the MikroTik router using ethernet cables. Make sure each connection is properly configured with the correct IP address, subnet mask, and gateway address.
- Create a Bridge Interface - In order to balance the traffic between multiple WAN connections, you need to create a bridge interface that includes all the WAN interfaces. To create a bridge interface, go to Interfaces and click on Bridges. Then click on the plus sign and select Bridge.
- Add WAN Interfaces to Bridge - Once the bridge interface is created, you need to add all the WAN interfaces to the bridge. To do this, simply drag and drop each WAN interface into the bridge interface.
- Create Gateway Groups - To balance the traffic between the WAN connections, you need to create a Gateway Group. A gateway group is a collection of gateways that you want to balance between. To create a Gateway Group, go to IP and click on Routes. Then click on the plus sign and select Gateway Group.
- Add Gateways to Group - After creating the Gateway Group, you need to add all the gateways to the group. To do this, simply click on the Gateway Group and add each gateway.
- Create a NAT Rule - Finally, you need to create a NAT rule that will forward all the traffic through the Gateway Group. To do this, go to IP and click on Firewall. Then click on the NAT tab and add a new rule. For the Action, select Masquerade, and for the Out Interface, select the bridge interface you created earlier.
And that's it! Once you have completed these steps, traffic will be distributed across all the WAN connections, giving you a more stable and reliable internet connection.
Conclusion
Implementing load balancing over multiple gateways can significantly improve your internet experience. And with MikroTik, implementing load balancing can be a seamless and affordable process. By following these simple steps, you can configure your MikroTik router to balance the traffic across all your WAN connections, resulting in a more stable and consistent internet connection.


Post a Comment for "Configuring Load Balancing With MikroTik Routers"